Why You Shouldn’t Ignore Chimney Cracks and How to Repair Them the Right Way
Key Takeaways
- Cracks in chimneys can lead to serious structural and safety issues if left untreated
- Identifying the root cause of chimney cracks is key to choosing the right repair method
- DIY fixes may be suitable for hairline cracks, but professional repair is often necessary for long-term safety
- Regular chimney inspections help catch early signs of damage before costly repairs are needed
What Causes Cracks in Chimneys and Why They Matter
Cracks in chimneys may seem minor at first glance, but they often point to deeper structural or moisture-related issues. These fissures can form in the bricks, mortar joints, chimney crown, or flue liner, each presenting unique risks. Over time, weather cycles, water intrusion, settling foundations, and even chimney fires can cause materials to expand, contract, and ultimately crack.
Ignoring these cracks doesn’t just compromise aesthetics. Water can seep through small openings, accelerating brick deterioration and potentially damaging your home’s walls, ceilings, and framing. In colder regions, moisture trapped in these cracks can freeze and expand, worsening the damage over time.
Worse yet, chimney cracks may allow toxic gases like carbon monoxide to escape into your living space, posing serious health risks. For this reason, early detection and prompt repair are not just cosmetic—they’re essential for both safety and home preservation.
Identifying Different Types of Chimney Cracks
Before attempting any repair, it’s important to recognize the type of crack you’re dealing with. Each has different implications and requires a tailored approach:
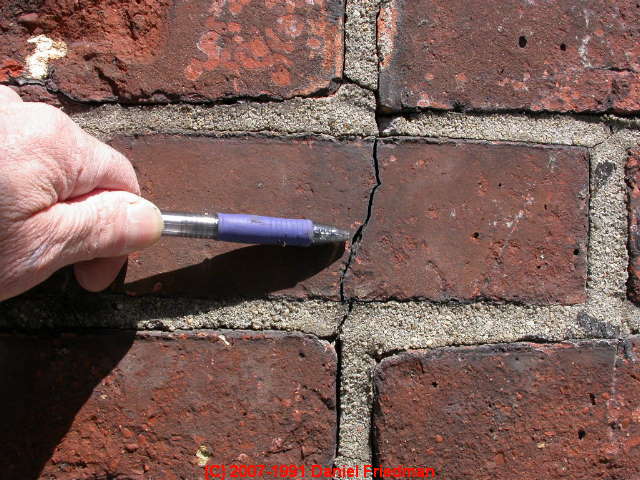
Hairline Cracks in Mortar or Brick
These are often superficial and usually caused by natural aging or slight shifting. Though they may seem harmless, they can allow water to penetrate and should not be ignored.
Vertical or Stair-Step Cracks
Common in masonry chimneys, these are signs of foundation settling or structural stress. They may also indicate that the chimney is leaning and needs a professional inspection.
Cracks in the Chimney Crown
The crown, located at the top of the chimney, protects against rain and snow. Cracks here allow water to enter and weaken the entire structure below.
Flue Liner Cracks
Often discovered during a chimney inspection, these cracks are serious. A damaged flue liner can cause smoke and gases to escape improperly, requiring immediate repair or replacement.
Recognizing these crack types can help you better understand the necessary repair steps and whether a DIY fix is reasonable or if professional help is required.
Step-by-Step Process for Repairing Chimney Cracks
If the damage is limited and doesn’t compromise the structural integrity of the chimney, you may be able to perform simple repairs yourself. For more severe cracks or leaning chimneys, always consult a certified mason or chimney professional.
Step 1: Conduct a Thorough Inspection
Start by examining the chimney from all sides. Use binoculars to check hard-to-see areas like the crown and flue. For interior flue liner cracks, a professional chimney camera inspection is recommended.
You can refer to the Chimney Safety Institute of America for guidance on inspection protocols and safety precautions.
Step 2: Clean the Cracked Area
Before applying any repair materials, clean the crack thoroughly. Remove loose debris, dust, and old mortar using a wire brush. For deep cracks, consider using a chisel to widen and shape them for better mortar adhesion.
Step 3: Choose the Right Repair Material
- For mortar joint cracks, use a premixed mortar repair caulk or tuckpointing mortar.
- For brick face cracks, use a high-strength masonry patch compound.
- For chimney crown cracks, apply a flexible crown sealant designed to resist temperature extremes.
- For flue liner cracks, a professional application of a cast-in-place liner or a heat-resistant flue sealant is often required.
Be sure to match your material with the severity and location of the crack.
Step 4: Apply the Repair Compound
For mortar and brick face cracks, use a pointing trowel to fill the gaps. Press the compound firmly and shape it to match the existing mortar lines. Allow it to cure for the time specified by the manufacturer.
For chimney crowns, brush the surface clean, then apply a water-resistant sealant in a continuous layer to cover the entire crown and fill any visible cracks.
When You Should Call a Professional
While some repairs are manageable for experienced DIYers, not all chimney cracks are created equal. If you notice any of the following, it’s best to contact a professional:
- Cracks wider than 1/8 inch
- Gaps that keep reopening despite repair
- Signs of leaning or shifting structure
- Water stains on interior walls near the chimney
- Flue liner deterioration or missing clay tiles
A qualified chimney technician can use specialized equipment to diagnose internal damage and offer long-term repair solutions such as rebuilding sections of the chimney or relining the flue. In many cases, this is far more cost-effective and safer than repeated surface patching.
Importance of Waterproofing After Repairs
Once your chimney cracks are sealed, don’t overlook the final step—waterproofing. Masonry materials are porous, which means they can absorb moisture even after repairs. Applying a breathable, water-repellent sealant to the entire chimney surface helps keep rain and snow from penetrating the brick and mortar.
This layer acts as a safeguard, prolonging the life of your repair work and reducing the likelihood of future cracks. Make sure the product you choose allows water vapor to escape, preventing trapped moisture that can cause internal damage.
Long-Term Maintenance Tips to Prevent Future Cracks
To ensure your chimney stays in good condition, adopt a proactive approach to maintenance. Here are some tips:
- Schedule annual chimney inspections to identify early signs of wear or damage.
- Install a chimney cap to prevent water, snow, and debris from entering the flue.
- Clean gutters and downspouts near the chimney base to avoid pooling water.
- Trim overhanging branches that may deposit moisture and debris onto the chimney.
- Monitor for efflorescence, a white staining that signals moisture issues in the masonry.
These steps help extend the life of your chimney, especially after you’ve invested in repairs. Regular care not only saves you money in the long run but also improves the overall safety and efficiency of your fireplace or heating system.
Why Timely Repairs Protect Your Home Investment
Delaying chimney repairs might seem harmless at first, but cracks rarely fix themselves. The cost of inaction often includes major structural repairs, water damage remediation, and even health risks from smoke or carbon monoxide exposure.
Addressing chimney cracks promptly protects not just the fireplace, but your roof, attic, and interior walls. It’s a smart way to maintain your home’s value and safety while preventing problems from escalating. Whether you handle minor fixes yourself or bring in an expert for larger jobs, acting early makes all the difference.