Why Homeowners Should Know How to Repair a Brick Chimney Before Damage Spreads
Key Takeaways
- Delaying chimney repairs can worsen structural issues and increase long-term costs
- Common chimney damage includes mortar decay, brick spalling, and crown deterioration
- Repairing a brick chimney involves proper assessment, cleaning, and masonry work
- Preventive maintenance and seasonal inspections help extend chimney lifespan

Understanding What Causes Brick Chimney Damage
Brick chimneys are constantly exposed to the elements, especially in regions with shifting temperatures and wet seasons. Over time, moisture, freeze-thaw cycles, and poor construction can all contribute to serious damage. Mortar joints can crumble, bricks may crack or spall, and water intrusion can weaken the interior flue.
If left unchecked, this damage doesn’t just affect aesthetics. It compromises safety and energy efficiency. According to the Chimney Safety Institute of America, water is the biggest threat to chimney systems, leading to rust, mold, and eventually structural failure. Knowing the cause helps you act fast with appropriate repairs.
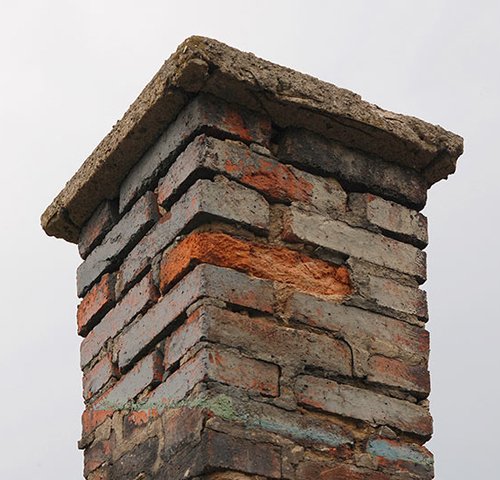
Spotting the Early Signs of Brick Chimney Problems
Before repairs begin, it’s important to know what to look for. Signs of chimney damage often start small and worsen with time. Here are common issues that signal it’s time to take action:
- Cracked or missing mortar between bricks
- Spalling, where brick surfaces flake or chip away
- Water stains on interior walls or ceiling near the chimney
- A tilting or leaning chimney stack
- Damaged or missing chimney crown or cap
Regular chimney inspections—especially before and after winter—can help catch these signs early. A qualified chimney professional can provide a full assessment, but for proactive homeowners, visual checks with binoculars or a ladder (if safe) are also useful.
Tools and Materials Needed for Basic Brick Chimney Repairs
Once the damage is identified, gathering the right tools ensures a safe and effective repair process. Here’s what most brick chimney repairs typically require:
- Cold chisel and hammer
- Tuckpointing tool or pointing trowel
- Stiff wire brush
- Mortar mix (preferably Type N or S for exterior use)
- Replacement bricks (if needed)
- Safety gear including gloves, goggles, and dust mask
- Scaffolding or a sturdy extension ladder
Using the correct materials—especially matching mortar and bricks—ensures the repaired section blends visually and structurally with the existing chimney.
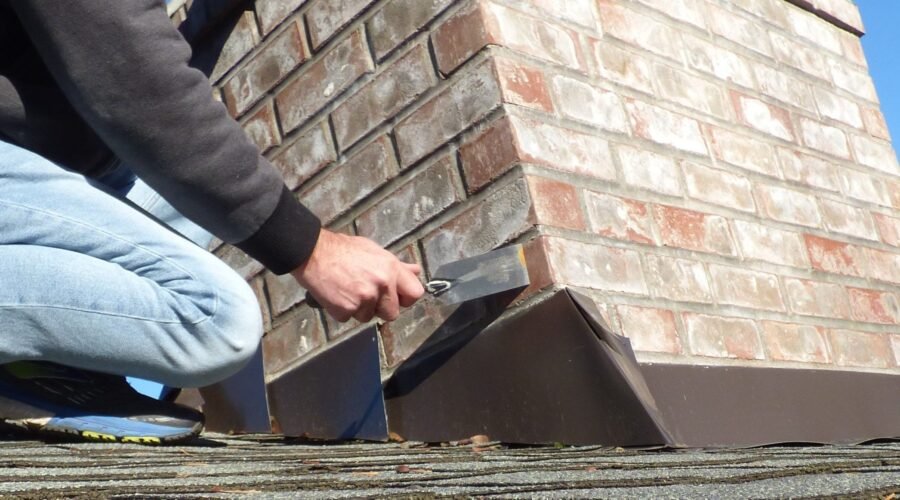
Step by Step Process to Repair Mortar Joints
Mortar joints often deteriorate faster than the bricks themselves. Tuckpointing is the process of removing old mortar and applying new mortar in its place. Here’s how to do it properly:
- Remove the old mortar
Use a cold chisel and hammer or an angle grinder to carefully rake out about ¾ inch of damaged mortar between the bricks. Work slowly to avoid damaging the surrounding brick edges. - Clean the joint thoroughly
A stiff brush or compressed air clears out dust and debris. The surface should be slightly damp before adding new mortar. - Mix and apply new mortar
Follow manufacturer instructions for mixing mortar. Use a pointing trowel or tuckpointing tool to pack the mortar into the joints in layers, ensuring a tight bond. - Finish and cure
Once filled, smooth the joints to match the existing ones and let the mortar cure slowly. Protect the area from rain or direct sunlight for at least 48 hours to allow proper setting.
Tuckpointing not only restores structural strength but also protects against moisture infiltration that can worsen brick damage.
Replacing Damaged Bricks Without Compromising Structure
If individual bricks are cracked or severely spalled, it’s better to replace them rather than patch them up. Here’s how to handle brick replacement safely:
- Remove the damaged brick by chiseling out the mortar and carefully lifting the brick without disturbing surrounding ones
- Clean the cavity to ensure a dust-free surface that allows mortar to adhere
- Apply fresh mortar to the bottom and sides of the cavity, insert the new brick, and tap it into place
- Tool the joints so they match adjacent mortar work, and allow the new brick to cure properly
Matching brick size, color, and texture can be challenging in older chimneys. Salvage yards or masonry suppliers often carry reclaimed bricks for a better match.
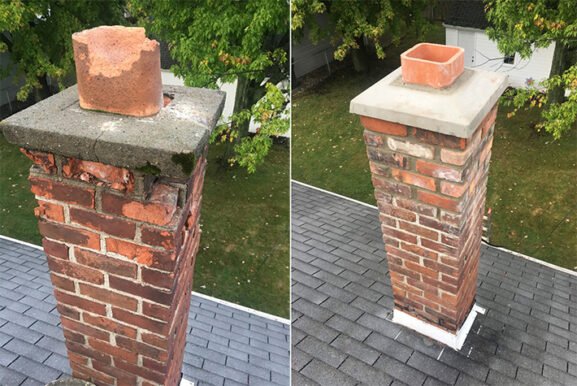
Don’t Overlook the Chimney Crown and Cap
The chimney crown and cap serve as the first line of defense against rain, debris, and wildlife. A cracked crown can funnel water directly into the flue system and interior walls, leading to costly water damage.
Repairing minor crown cracks can be done with a waterproof masonry sealant. However, larger fractures or missing sections often require recasting the crown with concrete. The chimney cap should also be inspected and replaced if it is rusted or missing.
These protective elements are small but crucial. A well-maintained crown and cap can extend the life of your entire chimney structure.
Hiring a Chimney Specialist for Major Repairs
While small repairs like repointing or replacing a few bricks can be DIY-friendly with the right skills, large-scale damage often calls for professional help. This is especially true if:
- The chimney leans or shows signs of foundational movement
- Large sections of brick are loose or unstable
- The chimney has internal flue liner damage
- There’s a history of water intrusion into the attic or walls
Certified chimney contractors can assess hidden damage and use proper materials for restoration. They also follow local building codes and safety standards, reducing the risk of future problems.
When hiring, always verify certifications and check for reviews or referrals. A trusted starting point is the National Chimney Sweep Guild (https://www.ncsg.org/), which maintains a directory of certified professionals.
How to Maintain Your Brick Chimney for the Long Term
Once your chimney is repaired, keeping it in good shape becomes a lot easier with regular maintenance. This includes:
- Annual inspections to catch early signs of wear
- Chimney sweeping to prevent soot buildup and flue blockages
- Waterproofing the chimney exterior with breathable sealants
- Checking and replacing chimney caps when necessary
Proper upkeep not only prevents expensive future repairs but also improves home safety and heating efficiency. Moisture remains the number one enemy of brick chimneys, so staying vigilant pays off over time.
Protecting Your Investment with Smart Preventive Steps
Brick chimneys are durable, but they’re not immune to time and weather. Whether you’re handling minor repairs yourself or hiring a specialist for more complex issues, the key is timely action. Staying proactive with inspections, sealing, and small fixes helps avoid major restoration projects later.
By understanding the structure, using proper repair techniques, and committing to seasonal care, you extend your chimney’s lifespan and preserve your home’s overall safety and value.