How to Repair a Leaking Chimney Without Overlooking the Root Causes
Key Takeaways
- Chimney leaks often stem from flashing issues, damaged crowns, or porous masonry, not just rain exposure
- Timely inspections and maintenance are critical to preventing internal structural damage
- Repair methods vary depending on the leak’s origin, so accurate diagnosis is essential
- Addressing water intrusion early can protect both your chimney’s integrity and your home’s interior
Understanding Where Chimney Leaks Begin
A leaking chimney might seem like a minor nuisance, but it can indicate a much deeper issue. Many homeowners first notice water stains on the ceiling near the fireplace or dampness inside the firebox. However, a leak is rarely due to just one factor. Chimneys are exposed to every weather condition imaginable, and over time, that exposure wears down key components like flashing, mortar joints, crowns, and chimney caps.
The challenge is that water can enter in one place and travel before showing up elsewhere. That’s why understanding the anatomy of a chimney is the first step to tackling a leak effectively. You need to consider the stack from top to bottom—starting with the crown and cap, all the way down to the flashing and brickwork.
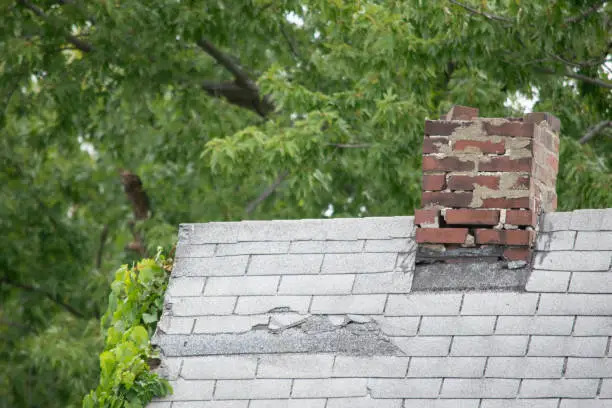
Checking the Flashing for Signs of Deterioration
Flashing is the thin metal sheeting that seals the intersection between the chimney and the roof. When properly installed, it channels water away from this vulnerable junction. But if flashing corrodes, lifts, or pulls away, it opens the door for leaks. You may see rust streaks, exposed nails, or cracked sealant along the edge—these are all indicators that water could be slipping in.
Repairs depend on the extent of the damage. If the flashing is loose or poorly sealed, you can re-caulk it with high-quality roofing sealant. For sections that are rusted or improperly lapped, complete replacement is a better choice. Make sure any replacement includes both step flashing and counter-flashing for a long-term seal.
According to the International Association of Certified Home Inspectors, improper flashing is among the most common chimney installation flaws, and it’s often the hidden culprit behind leaks (source).
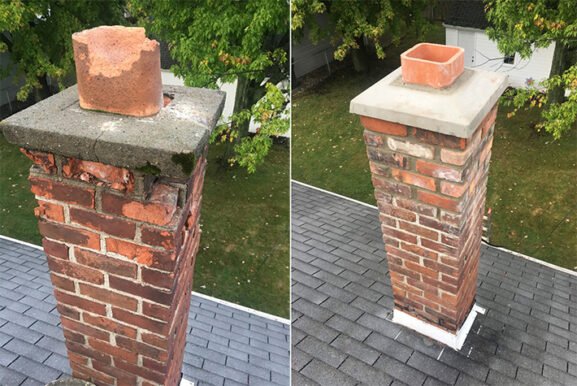
Evaluating the Chimney Crown for Cracks
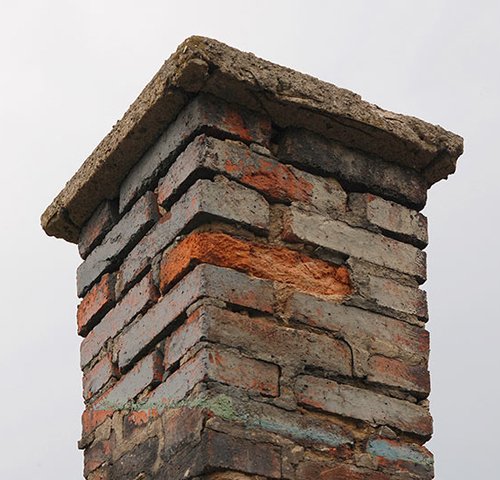
The chimney crown is the concrete or mortar layer at the very top that seals the flue opening and sheds water. When it cracks—often due to freeze-thaw cycles—it allows water to pool and seep into the masonry. Left unchecked, this leads to spalling bricks, efflorescence, and deep internal moisture damage.
You can spot crown damage by climbing onto the roof (only if it’s safe) or using binoculars from the ground. Look for hairline cracks, crumbling edges, or missing chunks. A minor crack may be repaired using a waterproof sealant designed for crown resurfacing. More severe damage may require complete crown rebuilding using a form and fresh concrete mix.
For long-term protection, apply a breathable waterproofing treatment once the crown is repaired. This stops water absorption while allowing vapor to escape.
Inspecting the Masonry for Gaps or Porosity
Bricks and mortar joints are porous by nature, but age, weather, and poor construction can make them highly absorbent. Over time, moisture gets trapped, weakening the structure from within. You might notice powdery white salt deposits (efflorescence), cracked mortar, or pieces of brick flaking off.
Tuckpointing—removing damaged mortar and replacing it with new, properly matched material—is the standard solution for deteriorating joints. When bricks themselves are compromised, they should be carefully removed and replaced. Afterward, applying a vapor-permeable water repellent can help prevent future issues without sealing in moisture.
Keep in mind that chimney masonry is different from general wall masonry, and improper materials or techniques can worsen the problem. This is a job where following building codes and best practices makes a real difference in performance and durability.
Don’t Overlook the Chimney Cap
A missing or damaged chimney cap leaves the flue wide open to water, debris, and even animals. This metal or stainless-steel cover sits atop the flue, allowing smoke out while keeping the elements at bay. Without it, rainwater can pour straight down the flue liner, soaking the firebox or pooling in the smoke chamber.
Installing or replacing a chimney cap is usually straightforward. Just make sure the cap is appropriately sized and designed for your type of flue. Stainless steel caps are durable and resist rusting. Some models even include spark arrestors or mesh screens to enhance fire safety and wildlife prevention.
A properly installed chimney cap can also help reduce downdrafts and improve the draft, providing both moisture control and better performance for your fireplace or stove.
Water Stains Indoors Could Be Misleading
One of the most confusing parts about a chimney leak is that the water stains you see indoors may not line up with the location of the leak. Water can travel along rafters, insulation, and chimney surfaces before showing up in your ceiling or walls. This often leads homeowners to assume there’s a roof issue when the problem lies in the chimney.
If you’re dealing with recurring stains or damp patches near your fireplace, a detailed inspection is critical. Thermal imaging tools or moisture meters can help pinpoint the entry point. Don’t rely on surface symptoms alone to guide your repairs.
Sometimes the chimney liner itself can crack or separate, especially in older clay-lined flues. While not the most common source of a leak, internal moisture penetration can still contribute to long-term deterioration. Chimney sweeps and licensed inspectors can use video camera equipment to check for interior damage you can’t see from the outside.
Why Waterproofing Isn’t a One-Size-Fits-All Fix
Waterproofing a chimney is often recommended as a proactive solution—but it only works when the chimney is in good repair. Spraying water repellent on already-cracked masonry or damaged crowns won’t stop a leak. In fact, it can mask the problem temporarily while allowing deeper damage to occur.
That’s why it’s critical to make structural repairs before applying any sealants. Use a breathable siloxane-based product specifically designed for masonry chimneys, not general waterproof paint or non-permeable coatings. These specialty treatments allow moisture to escape from inside the brick while blocking rain from getting in.
Also, note that waterproofing treatments need to be reapplied every 5 to 10 years depending on exposure levels and the product used. Periodic reinspection will help you time maintenance correctly and avoid falling back into costly repairs.
When Professional Help Is Necessary
Some chimney leaks can be patched up with basic tools and materials, but many require a more advanced approach. If you’re seeing water damage inside your home, structural brick failure, or ongoing leaks after DIY efforts, it’s time to call in a professional.
Certified chimney professionals can assess the full chimney system, from roof penetration to firebox, using specialized tools and industry-standard diagnostic methods. This ensures you’re not treating symptoms while ignoring the underlying cause.
Repairs that involve roof work, crown reconstruction, or flue liner damage should be handled by experienced technicians to avoid further damage or fire risk. Quality repairs not only restore your chimney but also extend its lifespan and protect your entire home from moisture intrusion.
Long-Term Maintenance Helps Prevent Future Leaks
One of the most overlooked aspects of chimney care is routine inspection. Even well-constructed chimneys degrade over time, especially in climates with seasonal freeze-thaw cycles. By scheduling annual chimney inspections, you can identify issues early—before they turn into leaks that damage ceilings, walls, or structural components.
Preventive maintenance includes cleaning the flue, checking flashing integrity, verifying the cap is in place, and resealing masonry as needed. These small steps can save you thousands in water damage repairs and ensure your fireplace remains both safe and efficient.
Staying proactive about chimney upkeep also aligns with national fire safety standards, helping to reduce fire hazards associated with creosote buildup or hidden water damage that compromises the flue system.
The Best Approach Is Root-Cause Repair
Rather than applying temporary patches or sealants where water is showing up, it’s far more effective to trace the problem to its source. This might mean a combination of flashing repairs, crown resurfacing, and mortar restoration—all tailored to your chimney’s condition. That layered strategy, rooted in accurate diagnosis, is what keeps leaks from recurring.
Focusing on root-cause repair ensures you aren’t revisiting the same problem year after year. Whether the leak originates from missing caps, worn flashing, or porous bricks, each component needs to be addressed on its own terms to restore the chimney’s ability to keep water out and performance in check.
By taking a long-view approach to chimney repair, you protect not just the fireplace, but the surrounding structure, roofline, and even your home’s indoor air quality.