How to Repair a Chimney Crown and Prevent Water Damage to Your Home
Key Takeaways
- A damaged chimney crown can lead to serious moisture issues if not addressed early
- DIY repairs are possible for minor cracks, but large-scale damage should be handled by professionals
- Using the right materials like crown sealant or pre-mixed mortar is crucial for lasting results
- Regular inspections help detect early signs of chimney crown failure and avoid expensive repairs
Understanding What a Chimney Crown Does
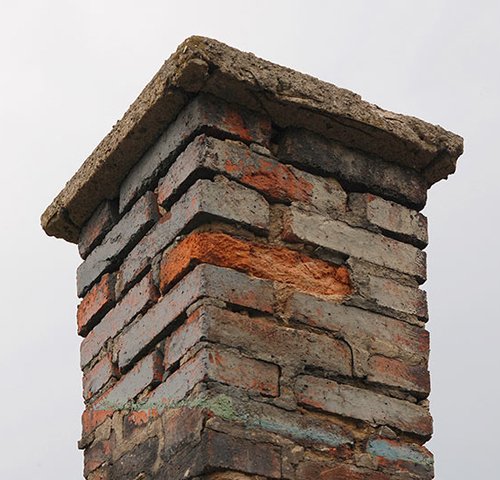
The chimney crown is the top slab of concrete or mortar that sits above the last row of bricks. It acts as a shield, protecting the flue and masonry from rain, snow, and debris. Its sloped design helps direct water away from the chimney stack, reducing the chance of brick deterioration or leaks. When the crown cracks or deteriorates, water can seep through and cause internal damage that’s hard to spot until it becomes costly.
Many homeowners don’t realize the importance of the crown until a chimney inspection reveals crumbling mortar, visible cracks, or water stains on interior walls. Knowing how to repair a chimney crown — or when to hire someone who can — is key to protecting your chimney’s structural integrity and extending its lifespan.
Signs That Your Chimney Crown Needs Repair
Spotting early signs of chimney crown damage can save you time and money. Look for:
- Hairline or larger cracks on the crown’s surface
- Pooling water or moss growth on top of the crown
- Discoloration or brick spalling below the crown area
- Water leaks inside your home near the chimney
If these issues go unchecked, moisture can seep into the chimney system and freeze during winter, expanding the cracks further. This freeze-thaw cycle accelerates deterioration and can even lead to chimney collapse in severe cases.
Preparing to Repair the Chimney Crown
Before starting repairs, it’s essential to assess the extent of the damage. For this, you’ll need a stable ladder, safety gear, and a clear view of the chimney crown. A light tap with a hammer can help identify hollow areas or crumbling spots that may not be visible at first glance.
Depending on the damage, you’ll need different materials:
- For minor cracks: Crown sealant or masonry caulk
- For deeper damage: Quick-setting concrete or chimney crown repair mix
- For total replacement: A form to shape new concrete and bonding adhesive
Always check the weather before starting repairs. Dry conditions and moderate temperatures are ideal for curing sealants or mortar mixes properly.
Repairing Minor Chimney Crown Cracks
If your crown has small cracks but is still structurally sound, you can use a flexible waterproof sealant designed for chimney tops. Start by cleaning the surface thoroughly. Remove any debris, dirt, or moss using a wire brush and rinse it off. Allow the crown to dry completely before applying any product.
Apply the sealant evenly across the crown surface using a brush or trowel. Most products require at least two coats, allowing adequate drying time between applications. The sealant penetrates the cracks and forms a waterproof barrier that can expand and contract with temperature changes.
One well-reviewed product for this job is CrownCoat by ChimneySaver, which is easy to apply and recommended by many professionals. You can read more about it on SaverSystems, a reputable manufacturer of masonry protection solutions.
Handling Moderate to Severe Crown Damage
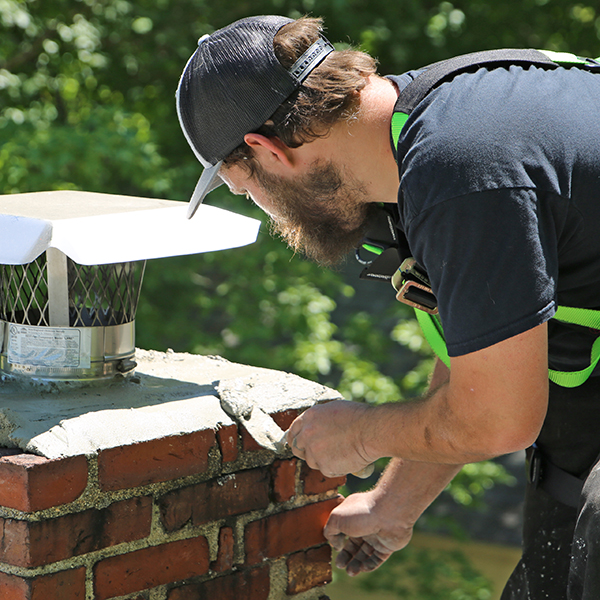
If the crown has deep cracks or areas of crumbling concrete, patching isn’t enough. In this case, you’ll need to resurface or rebuild the crown. Start by removing the damaged portion with a hammer and chisel. Be careful not to damage the bricks or flue liner beneath.
Next, apply a bonding agent to help new concrete adhere to the old structure. Then mix a durable crown repair compound or use pre-mixed hydraulic cement designed for outdoor use. Spread the new mix evenly, shaping it with a trowel to maintain a slight downward slope for water runoff.
Let the new crown cure for at least 24 to 48 hours, depending on the product instructions. During this time, shield it from rain using a tarp or chimney cover.
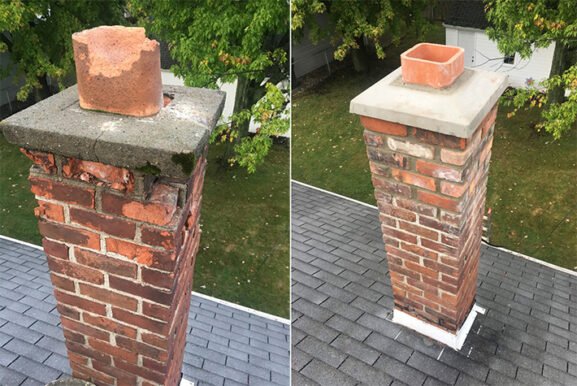
When to Replace the Entire Chimney Crown
In cases where the crown has deteriorated beyond repair — showing wide gaps, missing chunks, or unstable footing — full replacement is the safest option. This involves removing the existing crown completely and constructing a new one from scratch.
You’ll need to form a mold around the chimney using plywood or plastic sheeting. Once the form is set, pour a high-strength concrete mix and use a steel trowel to smooth it out. The slope should be at least 1 inch per foot to ensure proper drainage. Reinforcing the concrete with rebar mesh may be necessary for larger chimneys.
Because of the complexity and risk involved, full replacements are typically best handled by a licensed mason or chimney contractor. A poorly constructed crown can create more problems than it solves, so professional experience makes a difference here.
Choosing the Right Materials for Long-Term Results
The quality of materials you use plays a major role in how long the repair will last. Avoid basic mortar mixes not rated for exterior or high-temperature use. Instead, look for products labeled specifically for chimney crowns, such as:
- Elastomeric crown sealants
- Pre-blended masonry repair mortars
- Water-repellent concrete designed for freeze-thaw durability
In addition to using the right product, applying it at the right temperature and moisture level is equally important. Manufacturers often provide detailed guidelines — following them closely ensures a longer-lasting repair.
Regular Maintenance to Avoid Future Damage
Repairing the crown is only one part of chimney care. Ongoing maintenance helps prevent the same issues from returning. Have your chimney inspected annually by a certified professional to check for early signs of cracking, leaks, or crown wear.
Adding a stainless steel chimney cap above the flue can also reduce water and animal entry, extending the crown’s life. Some homeowners also apply water repellent to the entire masonry chimney to further prevent moisture absorption.
Even small steps like clearing debris off the crown after storms or snowfalls can make a noticeable difference in long-term performance.
Protecting Your Chimney Investment Over Time
Chimney crowns play a crucial role in shielding your chimney from water, temperature changes, and structural wear. Whether you handle minor repairs yourself or call in a pro for serious damage, taking prompt action protects your home from leaks, rot, and costly rebuilds.
Repairing a chimney crown doesn’t just improve your chimney’s lifespan — it also safeguards your walls, attic, and foundation from water intrusion. For many homeowners, staying proactive with this one component can make all the difference in avoiding extensive future repairs.